
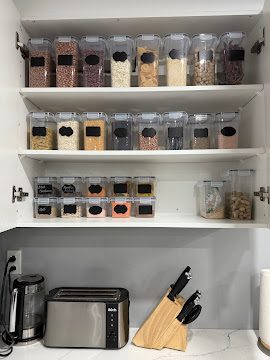
To organize a pantry, empty it completely, toss anything expired, then group like items together and give each group a dedicated zone, using clear bins and labels so everything has a home and stays easy to find. Put everyday items at eye level, heavy or bulk items down low, and rarely used items up high. Do it in one focused session and you will have a pantry that actually stays organized, not one that falls apart in a week.
A well-organized pantry does more than look good. It saves you money (no more buying a third jar of cumin you already had), cuts food waste, and makes cooking and weekly meal prep far less stressful. Here is exactly how to do it, the same process we use in homes across the Greater Toronto Area.
Step 1: Empty the pantry completely
Start by taking everything out. Yes, everything. It feels like a lot, but you cannot organize a space well while working around what is already in it. Pull every item onto your kitchen counter or table so you can see what you actually have.
This is also the moment you will discover the duplicates, the long-forgotten cans at the back, and the snacks that expired two summers ago.
Step 2: Purge expired and unwanted items
With everything out, work through it quickly:
- Toss anything expired, stale, or opened long ago.
- Donate unexpired, unopened items your household will not eat. Local food banks across the GTA accept non-perishables.
- Keep what you actually use.
Wipe down the empty shelves while you are here. Starting with a clean, blank space makes the rest of the process feel effortless.
Step 3: Group like items together
Sort everything you are keeping into categories. Common pantry zones include:
- Baking (flour, sugar, baking soda)
- Canned goods (soups, beans, tomatoes)
- Pasta, rice and grains
- Breakfast (cereal, oatmeal, spreads)
- Snacks (a dedicated bin makes grab-and-go easy)
- Spices and seasonings
- Oils, vinegars and condiments
- Drinks (coffee, tea, mixes)
Grouping is the single biggest reason an organized pantry stays organized. When every category has a clear place, putting groceries away becomes automatic.
Step 4: Assign zones by how often you use things
Now give each group a home on the shelves, placed by frequency and weight:
- Eye level: everyday items and snacks you reach for daily.
- Lower shelves: heavy items like bulk bags, large jars and drinks, and a low, open spot for kids to reach their own snacks if you want.
- Upper shelves: rarely used items, backstock, and seasonal or holiday baking supplies.
Keep the things you use most in the easiest-to-reach spots. The goal is for daily life to flow without bending, stretching, or digging.
Step 5: Use clear bins, baskets and risers
This is where a pantry goes from sorted to genuinely easy to maintain:
- Clear bins for snacks, packets and loose items, so you can see what is inside at a glance.
- Lazy Susans for oils, sauces and spices, so nothing gets lost at the back.
- Shelf risers or tiered racks for cans and spices, so you can see the back row.
- Airtight containers for flour, sugar, pasta, rice and cereal. They keep food fresh, save space, and look tidy.
- Door racks for spices or wraps if you have an empty door.
A quick note: containers organize what you have already decided to keep. Declutter first, then buy storage, and measure your shelves before you shop so everything fits.
Step 6: Label everything
Labels turn a one-time tidy into a system the whole household can follow. Label your bins and containers so everyone knows where things go, which is what keeps the pantry organized long after you finish. Simple printed labels or a label maker both work beautifully.
How to keep your pantry organized
The system only lasts if it is easy to maintain. A few habits keep it effortless:
- Decant or sort groceries as you put them away, straight into their zones.
- Practice first in, first out. New items go behind older ones so nothing expires unnoticed.
- Do a 5-minute reset once a week, usually right before grocery shopping, which also doubles as your shopping list check.
- Re-evaluate every few months. As your household's habits change, your zones can change too.
A local note for GTA kitchens
Many Toronto and York Region homes, especially condos and townhomes, have small or narrow pantries (or just a couple of kitchen cabinets standing in for one). When space is tight, vertical storage is your best friend: shelf risers, stackable bins, over-the-door racks and airtight containers make a small pantry hold more and feel calmer. Every inch has to work, which makes a good system even more valuable.
When to call a professional organizer
If your pantry (or whole kitchen) feels too overwhelming to start, or you have reorganized it before only to watch it fall apart, a professional organizer can help. We bring the system, the right products, and a second set of hands, then we haul away the donations and expired items so you are left with a finished, functional space. At Chaos Meets Order, we organize kitchens and pantries for families across Toronto, Vaughan, Maple, Markham, Richmond Hill, Aurora and York Region, and we offer ADHD-friendly organizing for anyone who finds traditional systems hard to keep up. See our organizing services or book a free consultation.
Frequently asked questions
How do I organize a pantry step by step? Empty it completely, toss expired items, group like items into categories, assign each group a zone by how often you use it, then add clear bins, containers and labels so everything has a home. Keep everyday items at eye level and heavy items down low.
What is the best way to organize pantry shelves? Place everyday items and snacks at eye level, heavy and bulk items on lower shelves, and rarely used or backstock items up high. Group like with like, and use risers or tiered racks so you can see the back rows.
Should I use clear containers in my pantry? Yes. Clear bins and airtight containers let you see what you have at a glance, keep food fresh, save space, and make the pantry easier to maintain. Just declutter first, then buy storage to fit what you are keeping.
How do I keep my pantry organized long term? Sort groceries into their zones as you put them away, use first in first out so nothing expires, label everything, and do a quick 5-minute reset before grocery shopping each week.
How often should I reorganize my pantry? A quick weekly reset keeps it tidy, and a fuller re-evaluation every few months lets you adjust your zones as your household's eating habits change.
Ready for a pantry that stays organized? If you would love help getting there, book a free consultation with Chaos Meets Order. We will build a system that fits your kitchen and your life, judgment-free.
How to organize a pantry that stays tidy
Knowing how to organize a pantry saves money and cuts food waste. Follow these steps on how to organize a pantry, then a quick weekly reset keeps everything easy to see and easy to reach.